
Generating IPA in Microsoft Office
(Word, Excel, Powerpoint, Access, Publisher)
Microsoft Office is available for just about all versions of Windows, MacOS and some people run it on Linux as well. All versions will have Word, Excel and Powerpoint, but if you get some of the more expensive versions you can get Access and/or Publisher as well.
First things first
You won't be able to use IPA with Microsoft Office until you have an IPA font installed, and most operating systems don't install one by default. So if you don't have an IPA font installed yet, go to Cool free IPA fonts to download and download one. If you need help installing it, go to How to install fonts on your computer.
General how-to and tips
You can insert IPA characters into any Microsoft Office application using the system method under General stuff to know about IPA on the main page for your operating system. (However, if using it under Linux you'll have to use the Windows way, so review the General stuff to know about IPA on the Windows page. (To go to the main page for your operating system click on one of the icons in the sidebar to the right.) Many users do this as their normal method. But if you just need to insert an occasional character it may be easier to use the Insert Symbol feature of Microsoft Office than to insert it with the system method above.
Inserting characters with Insert Symbol
To do this in any Microsoft Office application (except Access - see below for a note about Access) click on Insert on the main toolbar, then on Symbol. A window will pop up (see below) showing characters and it will be set by default to whatever font is used at the point where your cursor is. Therefore, the first thing to do is to click on Format, then on Font, and in the Font popup window set your text to the IPA font you want to use. (Tip: Click on the Font drop-down, then type the first letter of the font you are using, which will pop the Font drop-down directly to your font.)
This is the Insert Symbol window.
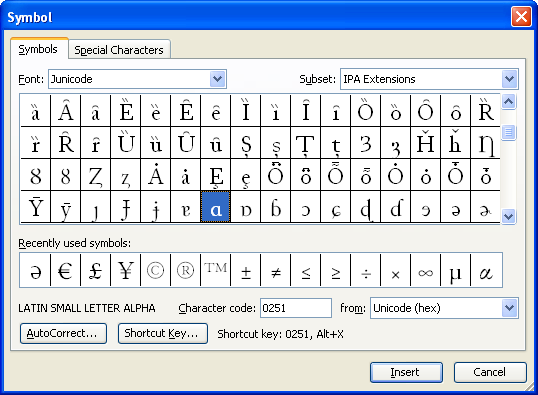
When the Insert Symbol window pops up it will be set to the Symbols tab which will look like the screenshot above. Note that you can scroll down to find all the characters in the font you have selected. In the above screenshot we have scrolled down and selected the script a. If you double click on a character it will be automatically inserted into the document you are working on (or click on the Insert button). You can scroll around and enter as many characters as you want, inserting it by double clicking on it or hitting the Insert button.
An important feature of the Insert Symbol window is that right above the Insert button is a box that says "from:." In the screenshot above it says "Unicode (hex)," and just to the left of it is the hex code for the character. If you are going to use a character a lot it would be helpful to note the number of the character. The reason for this is because you can enter any character into any Microsoft Office program (except Access, see note below) by typing the code and then Alt+x. Most people find this a lot faster than bothering to open the Insert Symbol window. It's especially faster once you memorize the codes for the characters you use a lot. You can even make yourself a cheat sheet of codes and tape it to the side of your monitor. In other words, the main thing you will end up using the Insert Symbol window for is to find the code for a character you haven't learned yet. And you don't even need it to use for that if you download our table of IPA codes from Download IPA chart. Ain't that just cool? Now, before we leave the Insert Symbol window we want to point out the Autocorrect button in the lower left, because that is our next topic.
Inserting characters with Autocorrect
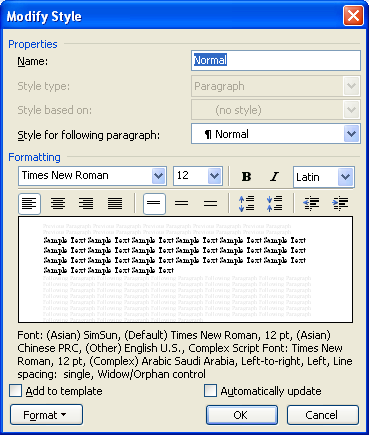
Microsoft Office has a cool feature called Autocorrect. To get to it click on Tools in the top menu, then on Autocorrect, which will get you a window that looks like this:

By default the Autocorrect window will pop up with the Autocorrect tab open, but if it doesn't (because Word thoughtfully tries to remember what you did last time), just click on the Autocorrect tab. Once you have a window open that looks like the above screenshot, notice the Replace and With boxes sort of in the middle of the window. Let's suppose you use the script a often, and let's also suppose that you learned its name as "fat-a." That's what our professor always called it, although he never explained why. So here's what you can do: Type "fat-a" in the Replace box, then in the With box type "0259" and hit Alt+x. The script a will appear in the With box, and now all you have to do is click on the Add button. That's it, you just entered a new Autocorrect entry for the script a. Now, wherever you are in Microsoft Office (including Access) you can just type "fat-a" and hit the spacebar. Office will automatically pop in the script a for you. That is coolness because it essentially allows you to create your own custom codes for the characters you use often. No more having to memorize lists of hex numbers.
Before we leave the exciting Autocorrect function we need to add one more thought. Remember the Insert Symbol window above? Remember the Autocorrect button in the lower left corner? OK, just go back to the Insert Symbol window, select a character, and click on the Autocorrect button. See what happens? Office will pop up the above Autocorrect window with the character already inserted in the With window. Now all you have to do is enter your mnemonic for it in the Replace window, hit Add, and you're done. You really must send a thank you note to Bill Gates.


Comments (0)
You don't have permission to comment on this page.